Classroom Setup
Creating a Class
1. To create a class in Touching Triton, you will need a class roster file that contains students' first name, last name, and a numeric identifier.
2. Sign in using your teacher login. (If you have not created a teacher account, click register here to create your free teacher account)
3. If this is your first login, you will be automatically directed to the Create a New Class option.
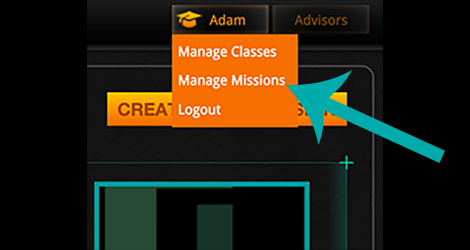
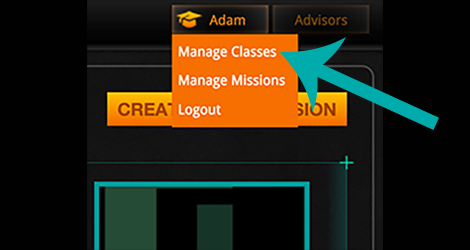
4. Your name appears on a tab in the upper right hand corner. Click your name to produce a drop down menu.
5. Select Manage Classes.
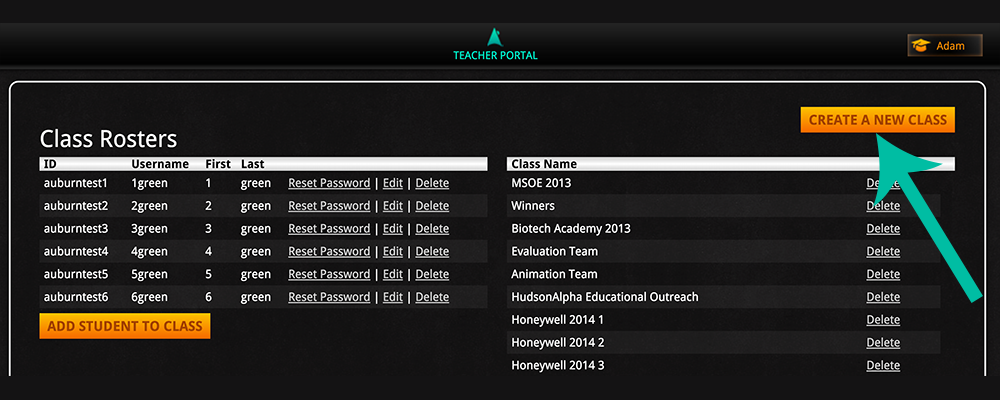
6. From the manage classes screen, click "Create A New Class".
7. There are 3 options to create a new class. You can enter class information manually, create a CSV class list using the provided template, or upload a CSV class roster file created by your spreadsheet program.
8. To enter your class manually, click "enter your class list manually". Input your students' information in the spaces provided. Click "Add 10 more" to create the appropriate number of slots for students. Give your class a name and click Create Class.
9. To create a CSV using the provided template, download the template. Input your class data and save the file. Make sure you maintain the .csv file extension.
10. To upload a class roster as a CSV file, click Browse, locate the file from your computer, click enter to select the file and click the arrow icon to upload the selected file.
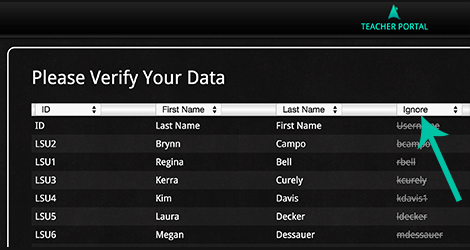
11. Use the "Please Verify Your Data" Screen to identify each column. Using the pull down menu at the top of each column, identify the First name, Last Name and ID number. "Ignore" any columns that contain extraneous data.
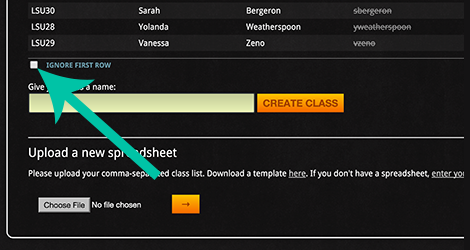
12. Scroll to the bottom of the page. Use the "Ignore First Row" button at the bottom of the list to ignore column headings, if any.
13. Provide a name for your class. We recommend descriptive names such as "Loftin3rdBiology2014". This class name will be visible as students log in to missions.
14. Click Create Class.
Creating a Mission
1. To create missions in Touching Triton, you must first create one or more classes. (See Creating a Class for instructions on creating classes)
2. Your name appears on a tab in the upper right hand corner. Click your name to produce a drop down menu.
3. Select Manage Missions.
4. You have three options for creating missions: manually selecting students to build groups, using quick add to build a single mission for the whole class, or generating multiple missions for a single class.
Building Groups
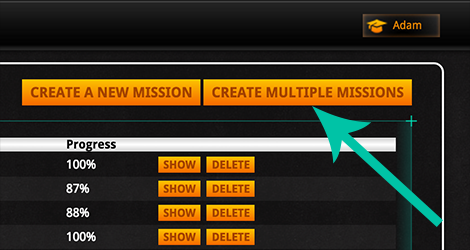
5. Click Create A New Mission to build group missions within a class.
6. Input a Mission Name. We recommend descriptive names such as "ADayBlock3-Group1" You may wish to use similar naming schemes for each mission created within a class.
7. Using the drop down menu under Assemble Your Team, select the class. Click enter.
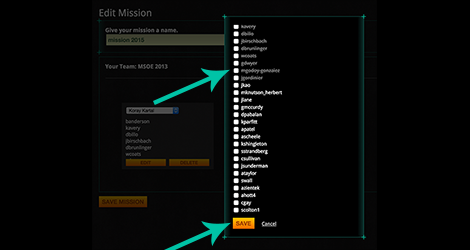
8. Click Add Group.
9. A selectable list of students in the class appears. Click the box next to the name of the student(s) you would like to work on a single crewmember. Scroll to the bottom of the list and click save.
10. Click Add Group again to create the next group within this mission.
11. A selectable list of students in the class appears. Students who are already placed in groups will be grayed out and not available. Click the box next to the name of the student(s) you would like to work on a single crewmember. Scroll to the bottom of the list and click save.
12. Repeat adding Groups until your missions for a single class, or divide students into groups within a single mission for the whole class.
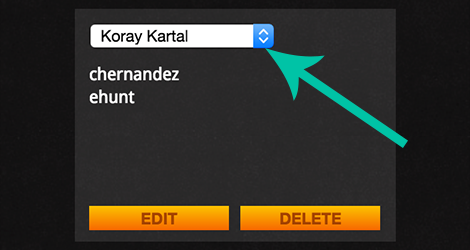
13. Change the selected crewmember using the arrows within the crewmember box.
14. Add or remove students using the Edit button within the group.
15. Delete entire group using the Delete button.
16. Click Save Mission.
Multiple Missions
17. Alternatively you may use Create Multiple Missions to randomly place students from a selected class roster into missions.
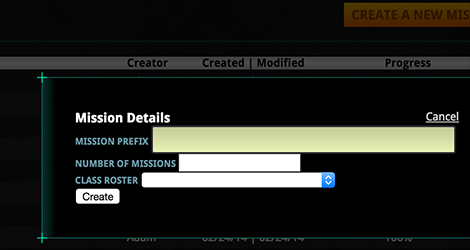
18. Create a Mission Prefix. This is an identifier that will precede each mission name within your class. For example: ADayBlock3.
19. Input the number of missions to be created. To have students working individually within each mission, a class of 30 would need 6 missions created.
20. Raise or lower the input number using the arrows within the box.
21. From the Class Roster drop down menu, select the class for which you would like to create missions.
22. This process may take several minutes.
Quick Add
23. Using the quick add option, will randomly place students from the class roster into teams. This will only create One Mission and will evenly divide students into groups working on a single crewmember. Insert Image
24. To remove a student from a group, click Edit within that group. Uncheck the student you wish to remove. Scroll to the bottom of the list and click save.
25. To delete a group, click Delete within that group.